French Bulldog Crochet Tutorial
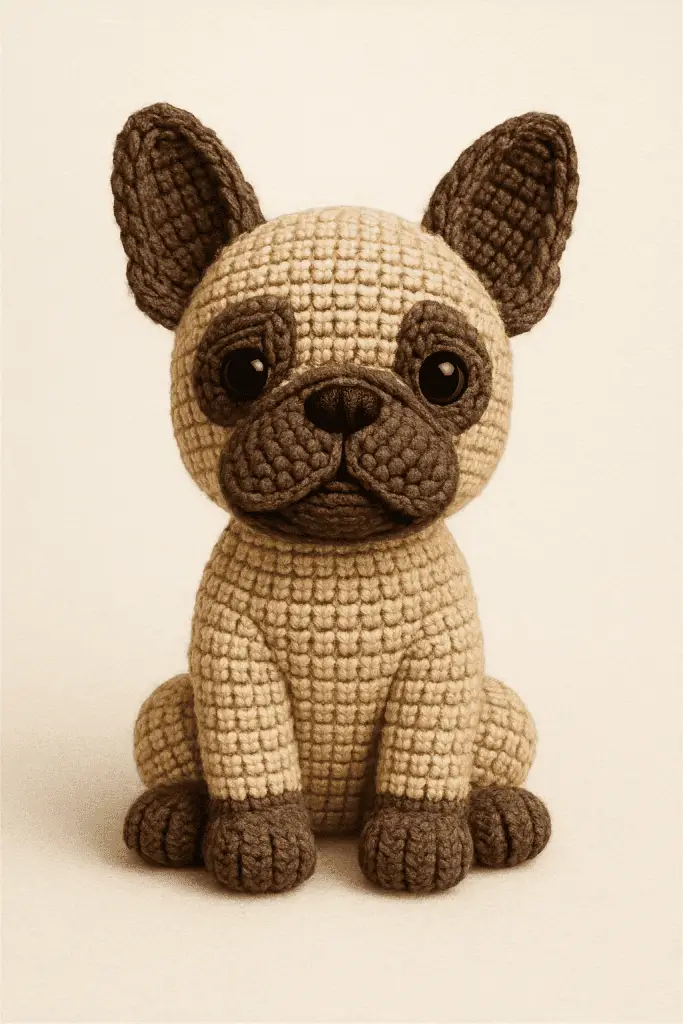
If you’ve ever scrolled through Pinterest or Etsy and thought, “Wow, I wish I could crochet one of those cute French Bulldog plushies,” then you’re in exactly the right place. This French Bulldog crochet tutorial is your go-to guide for creating an adorable amigurumi Frenchie—whether you’re a total beginner or someone who’s already obsessed with the world of yarn. And trust me, as someone who has spent way too many late nights crocheting “just one more ear” (you know how it goes), I get the excitement and the struggle.
Maybe you want something handmade for your desk, maybe a unique gift for a dog-loving friend, or maybe you simply want to learn amigurumi without feeling overwhelmed. Whatever your reason, this tutorial will walk you through everything—from choosing yarn to shaping the snout to sewing all those tiny pieces together. By the end, you’ll have your own miniature Frenchie buddy staring back at you like, “Bonjour, human!” 😉
Let’s get into it.
Choosing the Right Materials and Tools
Before we start stitching, let’s talk about supplies. You don’t need a big fancy kit—just the basics and a tiny bit of patience.
Recommended Yarn Types
Your yarn choice affects the entire personality of your Frenchie. Want a soft baby-style plush? Go with velvet yarn. Prefer a classic amigurumi look? Standard cotton works wonders.
Some popular options:
- Cotton yarn (DK or sport weight) – Great for beginners because it doesn’t split easily.
- Acrylic yarn – More affordable and comes in tons of colors.
- Velvet or chenille yarn – Perfect for a fluffy Frenchie but slightly harder to stitch.
For colors, you can’t go wrong with:
- Classic Frenchie tones: cream, gray, fawn, black, or pied combinations.
- A fun twist: pastel pink, lilac, sky blue… if you’re feeling artsy.
FYI: If you’re totally new to amigurumi, cotton is your safest bet.
Hook Size and Tools
A comfortable hook matters more than people admit. You’ll usually need:
- 2.0 mm to 3.5 mm crochet hook (depending on yarn weight)
- Stitch markers (to keep track of rounds)
- Fiberfill stuffing
- Tapestry needle
- Safety eyes (8–10 mm is perfect)
- Scissors
Optional but helpful:
- Pins for holding pieces before sewing
- A pet brush (if you’re going for a fuzzy finish)
Understanding the Basic Crochet Stitches
Even if you’re a newbie, don’t worry. The stitches used in amigurumi are simple and repetitive.
Core Stitches You Must Know
Here’s what you’ll use:
- Magic ring – Starts most parts of the plush.
- Single crochet (sc) – Your best friend for crocheting in rounds.
- Increase (inc) – Two single crochets in the same stitch.
- Decrease (dec) – Combine two stitches to shape curves.
If you know these four, you’re unstoppable.
Working in Continuous Rounds
Amigurumi is built in spirals. That means:
- No slip stitches at the end of each round
- Use stitch markers to avoid losing track
- Keep tension consistent for a smooth finish
Think of it like building your Frenchie layer by layer, almost like sculpting with yarn.
Crocheting the French Bulldog Head
The head is the star. Frenchies are known for their big cheeks and expressive faces, so this is where the magic happens.
Creating the Head Shape
You’ll start with a magic ring and increase to form a round sphere. As you work through the rounds, you’ll:
- Increase gradually to widen the head
- Work even rounds to keep the shape balanced
- Start decreasing to close the dome
A few pro tips:
- Keep your tension tight to avoid stuffing leaks.
- Try pausing after every few rounds to check symmetry.
Adding the Snout
The Frenchie snout is short and rounded—super cute and iconic.
Typical snout structure:
- Begin with a smaller magic ring
- Add a few increase rounds to create a tiny dome
- Slightly flatten the back with decreases
- Stuff lightly before attaching
Attach it to the lower center of the face, but IMO, positioning is everything. If it’s too high, your Frenchie looks surprised; too low, and it suddenly becomes a pug.
Installing the Safety Eyes
Safety eyes bring your plush to life—literally.
General placement:
- Insert between rounds where the face looks widest
- Keep even spacing
- Add felt circles underneath for a “soft eyebag” look if you want extra cuteness
Before securing the backs, make sure you’re happy with the expression. Once they snap, there’s no going back 😅
Shaping the Iconic French Bulldog Ears
Frenchies have big, triangle-shaped “bat ears”—one of their most recognizable features.
How to Crochet the Ears
Each ear is usually worked flat and then folded or worked in small rounds. A typical ear includes:
- A magic ring
- Several increase rows
- Slight shaping rows at the top to taper the triangle
Make two identical ears. They should be slightly curved forward.
Attaching the Ears
Here’s the trick:
- Pin both ears before sewing
- Aim for symmetry
- Tilt them outward slightly
- Stitch securely so they stand upright
Remember, the ears define the vibe. Slightly tilted = playful. Straight = alert. Lowered = sleepy Frenchie.
Building the Body
After the head, the body is surprisingly simple.
Body Structure
Most amigurumi bodies follow a rounded pear shape. You’ll:
- Work from the bottom up
- Increase for the belly
- Add even rounds
- Decrease toward the chest
You can stuff as you go or wait until the end. I personally prefer stuffing gradually to avoid awkward lumps.
Adding the Belly and Chest Definition
To give your Frenchie some charm, you can:
- Add an extra round of increases for a belly pooch
- Insert felt patches for chest markings
- Adjust stuffing firmness depending on the shape you want
Crocheting the Legs and Paws
French bulldogs have chunky legs, and adding that chonk factor makes your plush irresistible.
Creating the Legs
Each leg is typically:
- A small tube worked in rounds
- Slightly stuffed
- Closed off at the ends
Front legs are usually shorter; back legs can be longer or shaped at the top.
Attaching the Legs
You can choose between:
- Sewn legs – Classic and sturdy
- Jointed legs – Adds movement
- Flat-attach legs – For a sitting Frenchie
Before sewing, position the body upright to check balance. No one wants a Frenchie that keeps face-planting.
Adding the Tail and Final Features
Your Frenchie isn’t complete without the little corkscrew tail and finishing touches.
Making the Tail
A French Bulldog tail is tiny, so you only need:
- A short chain
- A few single crochets
- Maybe a slight curve made with increases
Attach it to the back with strong stitches to prevent wobbling.
Finishing Touches
These details make your crochet plush professional-looking:
- Embroider the nose shape with black yarn
- Add a small line for the mouth
- Lightly blush cheeks using pink fabric paint or pastel
- Brush out yarn (only if using wool or acrylic) for a furry effect
These tiny accents transform your plush from “cute” to “adorable masterpiece.”
Customizing Your Crochet Frenchie
Want a unique look? Here’s where your creativity comes in.
Popular Custom Variations
- Color patterns: pied, brindle, fawn, black mask
- Accessories: bow tie, bandana, tiny hoodie
- Body poses: standing, sitting, lying down
Fun Personal Ideas
You could even crochet:
- A mini croissant
- A food bowl
- A little bone toy
- A miniature sweater matching your own outfit (yes, people do this!)
Adding personality makes your crochet piece a total showstopper—and it’s fun.
Troubleshooting Common Problems
Even the best of us mess up. Here’s a cheatsheet for quick fixes.
Uneven Rounds or Gaps
Try these:
- Pull your stitches tighter
- Use a smaller hook
- Check that you’re working in proper spirals
Lopsided Face
Happens to everyone.
- Recount stitches
- Make sure increases are centered
- Double-check eye placement
Visible Seams
To avoid this:
- Stitch pieces together with matching yarn
- Use whip stitch or invisible stitch
- Align pieces before sewing
Troubleshooting is part of the process, and honestly, it teaches you more than the easy rounds ever will.
Final Assembly and Stuffing Tips
This is where the magic happens—you’re putting all the pieces together.
Best Stuffing Practices
- Stuff firmly but not too hard
- Shape as you go
- Use small tufts for smoothness
Assembly Order (Recommended)
- Head
- Snout
- Eyes
- Ears
- Body
- Legs
- Tail
- Embroidery details
Having a clear order helps everything look nicely aligned.
Care Instructions for Your Crochet French Bulldog
Because yes, your plush needs a little TLC too.
Cleaning Tips
- Spot clean with mild soap
- Use a tiny toothbrush for delicate scrubbing
- Air dry only
Long-Term Care
Keep it away from:
- Pets (they will 100% try to steal it)
- Direct sunlight
- Excess moisture
Your Frenchie will stay adorable for years.
Conclusion
Crocheting a French Bulldog amigurumi is one of the most rewarding little projects you can make—especially when that final stitch pulls everything together and you’re holding your own handmade Frenchie in the palm of your hand. You now know how to choose your materials, sculpt the perfect head and snout, build the body, shape those iconic ears, and assemble every little feature with confidence.
Whether you’re creating a gift, starting a collection, or just trying something new for fun, your finished French Bulldog will carry your personality, creativity, and effort in every stitch. So what’s stopping you? Grab your yarn, pick a color, and let the crocheting adventure begin. And who knows—your new Frenchie friend might just be the start of a whole pack! 🐾