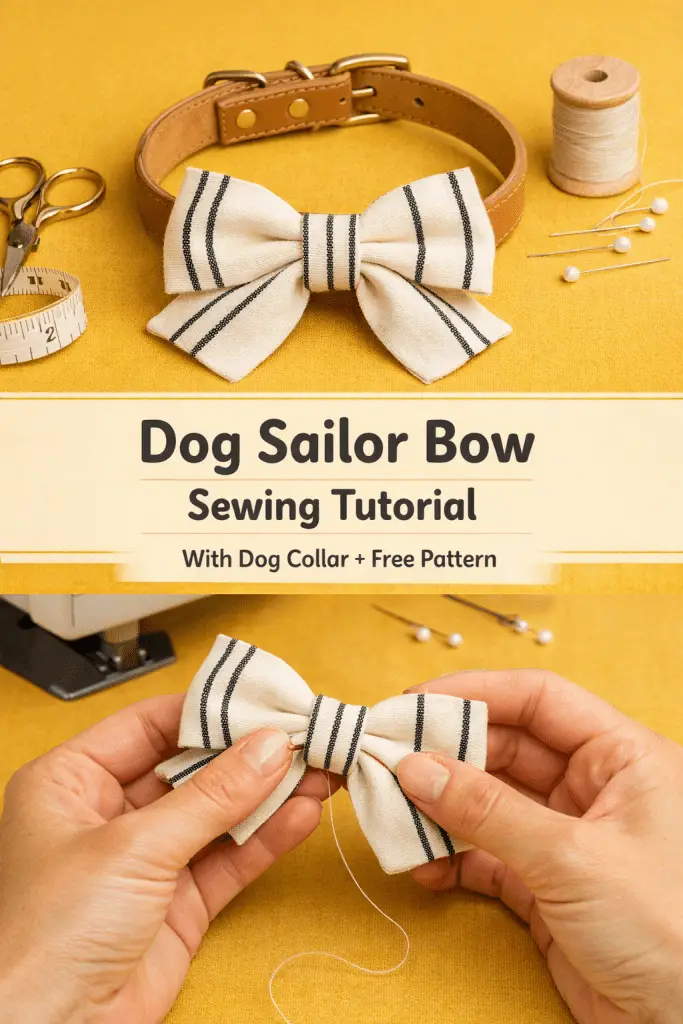
How To Sew Dog Sailor Bow/With Dog Collar/Free Pattern!
Let’s be honest—if your dog already owns more outfits than you do, you’re in good company. I mean, who can resist a dog sailor bow neatly attached to a collar? It’s cute, practical, and way easier to make than it looks. If you’ve ever scrolled Pinterest thinking, “I could totally sew that… maybe?”—this one’s for you.
I started sewing dog accessories after realizing how overpriced simple bows were online. IMO, once you sew one sailor bow yourself, you’ll never go back. Plus, it’s weirdly satisfying to see your pup strut around wearing something you made with your own hands.
In this guide, I’ll walk you through how to sew a dog sailor bow with a dog collar using a free pattern, step by step, in plain human language. No sewing snobbery here—just practical tips, beginner-friendly methods, and a little fun along the way.
What Is a Dog Sailor Bow (and Why It’s So Popular)?
A dog sailor bow is a structured fabric bow with folded ends that resemble a classic sailor style. Unlike floppy bows, this one holds its shape and looks polished without being stiff.
The best part? When it’s attached to a dog collar, it becomes:
- Removable and easy to switch out
- Comfortable for everyday wear
- Safe, since there’s no elastic pulling on fur
FYI, sailor bows are popular because they photograph beautifully. If you’re into pet photography or Etsy-style aesthetics, this bow is a win.
Why Sew a Dog Sailor Bow Instead of Buying One?
You could buy one. But sewing it yourself has perks that store-bought bows just can’t beat.
Here’s why DIY is worth it:
- Custom sizing for small, medium, or large dogs
- Fabric control, especially if your dog has sensitive skin
- Cost-effective, especially if you’re making more than one
- Creative freedom to match seasons, holidays, or outfits
Also, let’s not ignore the bragging rights. Someone will ask where you bought it.
Materials You’ll Need (Nothing Fancy, Promise)
Before you panic, this project uses basic supplies. If you’ve sewn even one straight line before, you’re good.
Here’s your checklist:
- Cotton fabric (quilting cotton works best)
- Matching thread
- Scissors or rotary cutter
- Sewing machine (hand sewing works too)
- Iron and ironing board
- Dog collar (nylon or leather)
- Free sailor bow pattern (printable)
- Pins or fabric clips
Important tip: Choose medium-weight cotton. Fabric that’s too thin won’t hold the sailor shape, and thick fabric gets bulky fast.
Choosing the Right Fabric for Your Dog
Fabric choice matters more than people think. This isn’t just about looks—it’s about comfort.
Best fabric options:
- Quilting cotton – beginner-friendly and breathable
- Light canvas – great for larger dogs
- Cotton blends – durable but still soft
Avoid:
- Super stretchy knits
- Slippery satin
- Heavy upholstery fabric
Ask yourself: Would I want this rubbing against my neck all day? If not, skip it.
Understanding the Free Sailor Bow Pattern
The free pattern usually comes in three main pieces:
- Bow body
- Center wrap
- Collar attachment piece
Each piece serves a purpose, so don’t skip any. The pattern is typically sized, but you can scale it easily.
Quick sizing guide:
- Small dogs: 4–4.5 inch wide bow
- Medium dogs: 5–6 inch wide bow
- Large dogs: 6.5–7 inch wide bow
Print the pattern at 100% scale and double-check measurements before cutting. Trust me, this saves frustration later.
Cutting the Fabric the Right Way
This step sets the tone for the whole project. Clean cuts = clean bow.
Here’s how to do it:
- Press your fabric first (wrinkles distort size)
- Lay pattern pieces on the fabric’s straight grain
- Pin securely before cutting
- Cut slowly and accurately
You’ll typically cut:
- 2 bow body pieces
- 1 center wrap piece
- 1 collar attachment piece
If your fabric has a directional print, double-check orientation. Upside-down anchors are not the vibe.
Sewing the Sailor Bow Body
This is where it starts to look real.
First, place the two bow body pieces right sides together. Sew around the edges, leaving a small gap for turning.
Key tips:
- Use a ¼-inch seam allowance
- Clip corners carefully (don’t cut stitches)
- Turn right side out gently
- Press flat with an iron
Once pressed, fold the ends inward to create that signature sailor shape. Press again. Yes, ironing matters more than sewing here.
Creating the Center Wrap
The center wrap pulls everything together—literally.
Steps:
- Fold the center wrap piece lengthwise, right sides together
- Sew along the long edge
- Turn it right side out
- Press flat
Wrap it tightly around the middle of the bow and stitch it in place on the back. This step defines the bow, so snug is good—but don’t squash it.
Making the Dog Collar Attachment
This is what turns a cute bow into a functional one.
Most patterns include a simple rectangular loop that slides onto the collar. It keeps the bow secure without permanent attachment.
To sew it:
- Fold the piece lengthwise, right sides together
- Sew the long edge
- Turn and press
- Fold into a loop sized for your collar width
- Stitch ends together securely
Pro tip: Always test the collar fit before final stitching. Collars vary more than you think.
Attaching the Bow to the Collar
Slide the collar through the attachment loop on the back of the bow. That’s it—no glue, no snaps, no drama.
Why this method works:
- The bow stays centered
- It’s removable for washing
- You can swap bows in seconds
If the bow tilts, adjust the loop placement slightly higher on the back. Small tweak, big difference.
No-Sew Option (Yes, Really)
Not feeling the sewing machine today? I get it.
You can make a semi-no-sew version by:
- Using fabric glue instead of stitching
- Pressing folds firmly while drying
- Reinforcing stress points with hand stitches
Is it as durable? No. But for photo shoots or occasional wear, it works in a pinch.
Common Mistakes (and How to Avoid Them)
Everyone messes up the first time. Here’s what usually goes wrong—and how to fix it.
Most common issues:
- Bow looks floppy → Use sturdier fabric
- Bow is crooked → Re-press folds evenly
- Collar doesn’t fit → Measure collar width first
- Bow won’t stay centered → Adjust attachment loop
If it’s not perfect, that’s normal. Dogs don’t judge. Instagram might, but dogs won’t.
Washing and Caring for the Sailor Bow
Handmade doesn’t mean high-maintenance.
Care tips:
- Remove from collar before washing
- Hand wash or gentle cycle
- Air dry flat
- Light iron if needed
Avoid dryers—they can warp the shape. IMO, air drying keeps it crisp longer.
Fun Ways to Customize Your Dog Sailor Bow
Once you master the basic pattern, customization is endless.
Ideas to try:
- Seasonal fabrics (Halloween, Christmas, birthdays)
- Monogram vinyl on the bow center
- Matching leash accessories
- Double-layered bows for extra flair
This is where sewing gets addictive, just saying.
Conclusion
So there you have it—how to sew a dog sailor bow with a dog collar using a free pattern, broken down into doable, no-stress steps. You learned how to choose the right fabric, cut cleanly, sew the bow body, and attach it securely to a collar.
More importantly, you now have a skill that turns scraps of fabric into something genuinely adorable. Whether you’re making one bow or twenty, each one gets easier—and cuter.
Go grab that fabric, fire up the iron, and make your dog the best-dressed pup on the block. And if they act unimpressed? Don’t worry. They’ll forgive you when treats appear